The Best DIY Solar Heating System: A Cost-Effective Solution (Complete Guide)

Are you looking to build and install DIY solar heating systems yourself?
Well, today I have something that will make you feel like DIY superman:
I'm about to show you (step by step) how to build solar heating system for home, only using scrap parts worth less than a hundred bucks.
Keep reading to learn about DIY Solar Heating System that looks cooler than Tesla's Solar Roof
Want to know the best part?
I built my first homemade solar panels with soda cans only!
Check out my home-built solar furnace in action (it's a short video):
OK, without further ado, let's dive right in.
First, let's cover the basics of solar power usage. There are 3 types of solar panels:
- Solar PV (PhotoVoltaic) Panel - creates electricity;
- Solar Powered Water Heater - heats up water;
- Solar Powered Air Heater - heats up the air.
Now, you may not want to hear this:
Most residential solar companies will not tell you that other, more efficient options can be used instead of PV solar panels. So instead of focusing on solar electricity, it is much cheaper to install solar space heating.
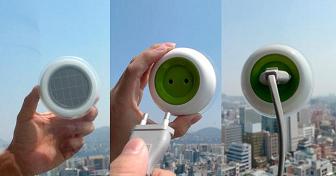
See also: What is a solar powered outlet?
In this guide, you'll learn:
Look:
I started researching DIY solar panel kits in 2009.
Note: This post was first published in 2013. I recently gave it a much-needed update (for 2023) and added many great tips and enhancements that I recently learned. Enjoy!
There were not so many free step-by-step installation guides on the internet at that time. Solar thermal installer resources for beginners were not easily available.
Today, you can simply search for various patents online, like this one, and study them.
Back then, I reached out to several solar system manufacturers and professional solar installers for advice on how to build a solar system.
I asked them two simple questions:
Can I Install My Own Solar Panels?
Would I Make a Good Solar Thermal Installer?
What they answered might shock you.
They told me that building solar systems from scratch and solar panel installation is very complicated.
They also told me I would have to get a solar permit and pass certification training to install and build my own solar energy systems.
And guess what?
They were all wrong!
Thanks to Gary Reysa and Mother Earth News, I stumbled across the cansolair solar heating system on the internet.
It took me less than 1 second to realize how awesome this project is. I instantly decided to start working on my own diy solar installation project.
This is what I learned by studying their commercial version of the solar space heater:
Unlike the solar PV system, even a simple homemade solar power heater could produce 2 KiloWatts of power without much effort or battery storage.
That truly makes it a perfect do-it-yourself solar heating system for homes.
Let's face it:
The concept of making and installing home solar heating systems yourself is not new.
Some homeowners choose DIY to save a few bucks (actually thousands of dollars).
Others do it for fun or simply because they want to build something useful and learn something new (that's me 😂).
The first thing you're going to learn today is figuring out if DIY solar is for you and how to build solar panel systems for houses.
In fact, going solar has significant benefits for homeowners:
- Solar increases the value of your home;
- Solar investment lowers your utility bill;
- Decreases environmental pollution by lowering the carbon footprint;
- Solar brings considerable savings by reducing electricity expenses;
- It makes you feel good (because you did something right!).
Because of the high price tags that system designers put on commercial systems, solar equipment can be a significant investment. To save money, many homeowners are buying DIY solar panel kits.
To help you decide about making your own solar energy system, I have compiled a list of 5 necessary steps. You only need to check them and figure out if this is something you can do or not.
How to Build a DIY Solar System in Five Steps
These are the exact steps that I will be explaining in-depth with this solar guide:
- Determine energy consumption and optimal energy needs for your home (using the solar calculator or some other method). Do not forget to factor in the consumption of your electric car;
- Choose the size and design of your system: PhotoVoltaic solar system or solar space heater (in case of solar PV, choose between grid tied or battery aided off grid solar system with solar charge controller);
- Get solar system components (soda cans, racking, string inverter, etc...);
- Get to the job and build a solar panel.
- Install a solar panel, connect it to your home.
How DIY Solar Heating System Works?
Let's take a look at how DIY solar powered heater for homes works.
Let me be clear about something - with this system, there is no net metering to worry about, or deep cycle batteries with breaker box disconnect switches.
But it is very simple.
When it's sunny, regardless of outdoor temperature, solar cells (made using pop-cans) heat up very quickly. The air blower drives cold air from the inside of the home or patio (solar patio heaters), through heated solar cells, and then back into the room.
See also: Best Solar Powered Heater for RV
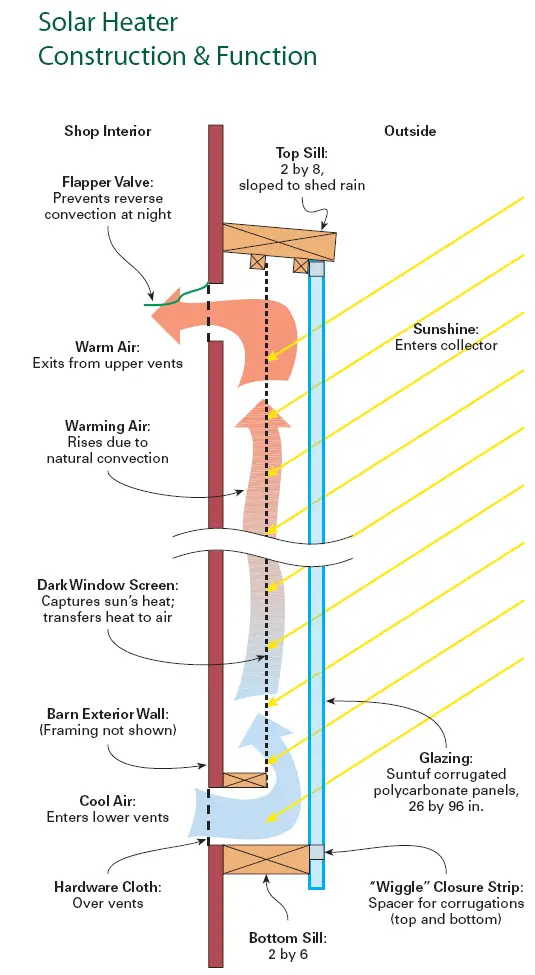
Moving air acts as a medium for collecting solar power from each cell and then brings the heat back into the room. The room, solar panel, air intake, and air exhaust form a closed-loop air circulation system.
The air cannot escape outside of the solar cell walls (pop can), which helps avoid fogging and deposition of dust on the Polycarbonate sheet's inner side. The following image shows a simplified sketch of all air heating system elements.

OK, let's summarize how this thing works:
The fan draws cold air from the room into the solar panel. The air goes through the filter and passes a one-way-pass-valve. Separate airflow-directing compartments (made of aluminum sheet 1 mm / 0.04 inches) distribute the air throughout the solar panel system.
I have strategically placed these junction boxes on the lower and upper part of the DIY solar generator. The bottom of the collector's housing is funneling the air into solar cells (tunnels constructed using pop cans). The air gets warm in contact with the solar cell wall. It raises and goes toward the output located in the upper corner of the room.
Solar power heater is indeed sun-powered, but an electric system is still needed to drive the airflow. If you live in a remote place (off the grid), you'll need to utilize solar electricity. Hook up a small PV panel or wind turbine to power the air blower.
Those who want to master sustainable living and have a fully autonomous offgrid solar system would require some additional effort.
Anyways, once you start working on it, you will realize it is not as complicated as the International Space Program.
It can be achieved by constructing DIY solar panel system aided with a wind generator and battery backup systems.
But before you do that, make sure to read the next technique on my list…
First Step - Cut Your Home's Heat Loss
Before going solar, you'll need to conduct a thorough assessment of your home and roof insulation. The idea is to improve heating efficiency, cut all possible losses and achieve massive cost savings.
Why is this part so important?
Because after reducing heat losses in your home, you can install smaller solar space heater and get the same result as the twice bigger solar system.
If you want to achieve this with a simple hack, check out my post on how to improve the thermal efficiency of your home using bubble wrap insulation on windows.
See also: How to build your own passive solar home.
Do-It-Yourself Pop Can Solar Powered Space Heater Construction
Heater mounting racks are made using plywood (15mm/0.6in thick), while its front is a polycarbonate sheet, 3mm/0.12in thick. You can use tempered glass, but it will make your solar panels much heavier. I have insulated the backside of the solar collector with 20mm/0.8in rock-wool.
The solar collector's main ingredients are aluminum cans, painted matte-black (any soda cans will do: Coke, Pepsi, beer, and other pop cans). The top of each can is cut and bent to ensure maximum solar panel efficiency by improving the heat exchange between the pop cans and the flowing air.
Step by Step Guide: Building DIY Solar Heating Systems
I have to warn you – solar installation is not an easy task for the complete and total beginner. But do not get discouraged – that is why I have created this do-it-yourself solar guide. I'll walk you through the exact procedure that I used, step-by-step.
Let's dive right in.
First, let's collect empty soda cans for solar panel assembly. Wash them thoroughly to prevent strange odors from showing up during the first run of the solar furnace. Pop-cans generally contain aluminum, but there are some made of iron. For this solar project, we need aluminum cans. You can quickly test them with a magnet.
Carefully cut the top of each can with a sharp can-opener, then remove the loose top out of the can. You need to carefully punch the bottom of the can with a large Philips screwdriver and then widen the hole up to max 1/3 of the can top radius.
The shape of the bottom hole in the form of a star has a task to provide turbulent airflow, which will enhance heat transfer from the can wall to the passing air.
The idea is to encourage turbulent airflow inside the soda can solar panel so that the air passing through the solar chimney can collect more heat from the warm pop can walls.
It is essential to do this before gluing the cans together. You can find more details about the exact steps on YouTube: DIY solar panels video guide.
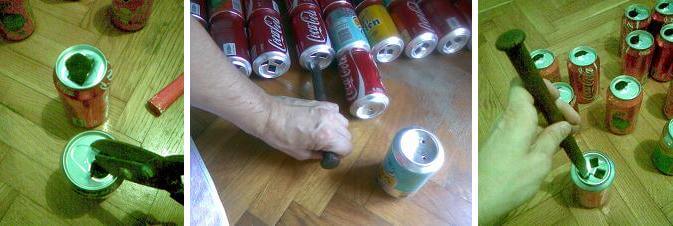
Image 1 Image 2 Image 3
BE CAREFUL! This procedure is hazardous because of a thin pop can wall. Sharp parts may cause hand injury.
After completing the bottom hole punching, small parts of the metal could remain inside the can. Use pliers to remove these parts.
Do not remove pieces of sheet metal and debris with your bare hands!
Remove grease and dirt from the surface of cans. Any synthetic de-grease agent will do the job. Make sure to do it outdoors or in a well-ventilated room.
BE CAREFUL! This procedure is flammable! It is dangerous to do this near the open flame or cigarette!!!
Glue all cans together using adhesive silicone resistant to high temperatures (up to 200°C/400°F). Some glues can easily withstand temperatures up to 300°C/570°F.
The top and bottom of pop cans are compatible and fit ideally one onto another. Put some glue or silicone on the edge of one can and press it against the other. In this way, the glue/silicone will not run away from the side.
Picture 4 shows the inside view of two pop cans glued together, while a series of stacked and finished cans is in image 5.
Picture 4 Picture 5 Picture 6
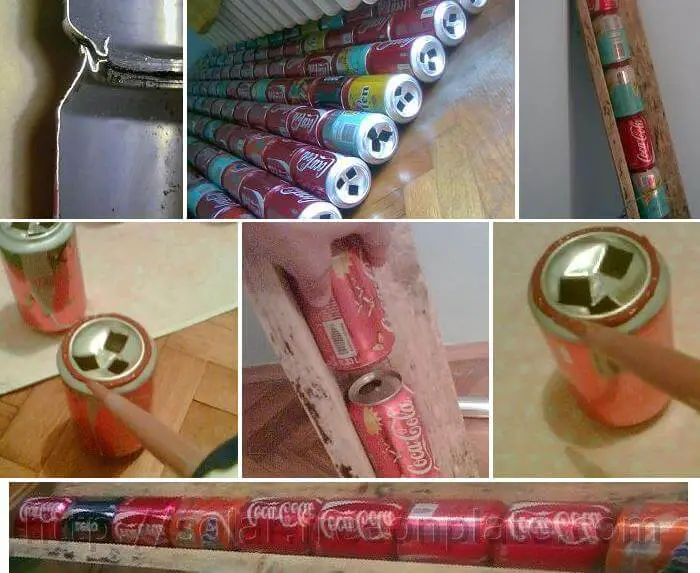
Image 7 Image 8 Image 9
Picture 10
Prepare a fixing template for stacking the cans - "L" shaped profile shown on image 6. You can basically use any two flat wooden planks and nail them together. A wooden fixer will provide the necessary support for the solar pop can pipe during the drying process.
Also, do not forget to secure the cans onto a fixing template using jar rubbers.
Images 7, 8, and 9 show the gluing process. A series of glued pop cans form a solar chimney (I like to call it a "thermal solar cell"). Picture 10 shows the tube in a fixed position until the glue gets completely dry.
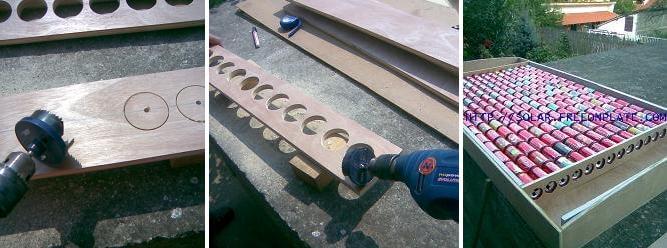
Image 11 Image 12 Image 13
Air intake and exhaust junction box for solar DIY heating system are made using wood or aluminum, 1mm/0.04in thick (Images 11 and 12). It's time to have the gaps around the edges filled with adhesive tape or heat-resistant silicone. Drill 55mm/2.16in diameter cut-outs on one side of the intake/exhaust box.
Drilled parts can be seen in images 12 and 13. This is where the first row of cans will be glued to the air intake/exhaust boxes. Check out how it looks once all the parts are assembled and prepared for painting (img. 13).
Let the adhesive dry for at least 24 hours.
Solar cell fits perfectly into the wooden casing (img. 14). The backside of the solar panel box is made out of plywood. Rock wool or styrodur is a perfect choice for insulation - image 15. You'll need to pay special attention when insulating openings around the solar collector air intake or exhaust.
Before the final step - installing the solar panel, you'll need to prepare, protect, and paint a wooden box (solar panel racking).
How to Install Solar Heating System for Home (Step by Step)
For best performance, solar powered air heater should be installed on an external wall or roof (ideally south facing).
If that's not possible, then the south-east or south-west position will also do the job. When determining the position for solar collector mounting, consider the angle of the sun's rays in the winter season, as shown in the image:
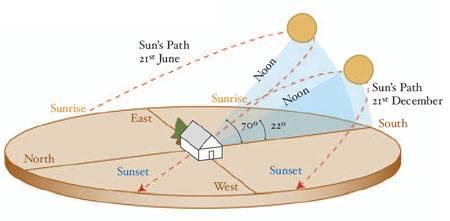
Instead of a roof mounted or ground mounted system, I have decided to hang the solar powered heater on my house's south wall.
Not perfect, but it is the most practical solution. It also prevents overheating during the summer.
The reason is practical: It's much easier to install and maintain solar equipment on the wall than on the roof.
Now prepare the mounting support: attach special hooks to all four corners of the solar collector so that you can hang it on the wall (img. 16) using 10mm/0.4in screws (img. 17). As a first step, I have placed an empty box on the wall to precisely mark the spot for drilling the air inlet/exhaust junction box.
Picture 14 Picture 15 Picture 16 Picture 17
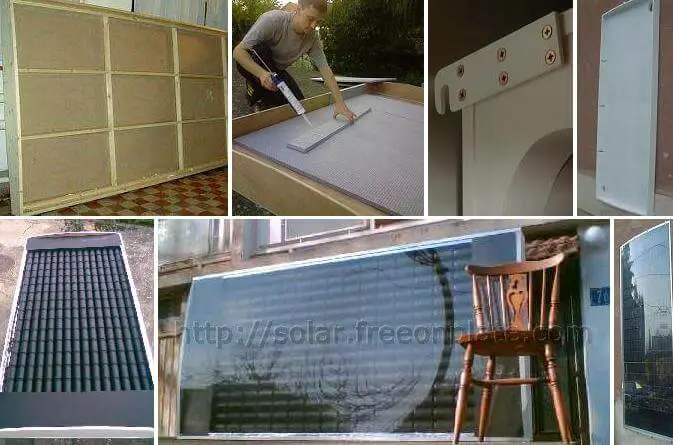
Picture 18 Picture 19 Picture 20
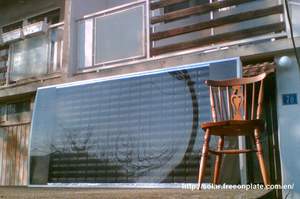
Finally, I painted the solar panel in matte-black and placed it inside the wooden case. A polycarbonate sheet, thoroughly corked with silicone, acts as the case cover. To prevent bending during the extreme heat throughout the summer, I have bent the polycarbonate/plexiglass and made it slightly curved (convex).
Picture 18 shows installed solar cells without plexiglass. A completed solar collector is shown in image 19. Finally, photo 20 shows the installed DIY solar power system. You have probably noticed there is no ground mount.
Bottom line: you do not need to hire a professional solar installer if you want get the job done.
What Does it Cost to Build Pop Can Solar Panel?
The following table contains parts needed for assembling soda can DIY solar panels.
It is a list of parts and calculation of the cost without elements damaged and wasted during the experimenting and prototyping process.
If you strictly follow my "do it yourself" guide, the solar panel total cost will be around $200 (for the 2KW system size).
DIY Solar Generator Parts List
| PART | QTY | $ |
| Plexiglass | 27ft² / 2.5m2 | 70 |
| Alu-Sheet | 6.5ft² / 0.6m2 | 7.5 |
| Wood | 40ft² / 3.7m2 | 29.5 |
| WoodPaint | 2cans | 10.5 |
| Blk. Paint | 3cans | 15.5 |
| Styrodur | 43ft² / 4m2 | 11.5 |
| Silicon | 4cans | 17 |
| El. Fan | 1 pc | 23.5 |
| Alu-Profile | 22ft / 6.6m | 11 |
| Snap Disc | 1 pc | 9 |
| TOTAL | $205 |
Using Recycled Parts Can Lower Solar Panel Cost
You could substantially reduce the price of solar panels if you make an effort to use parts that are otherwise collecting dust lying around in your garage.
Besides, you will need to collect empty soda cans. If you don't drink beer or soda, you can ask for empty pop cans in any restaurant or gas station. It is also essential to get all the necessary tools before you start building.
The most expensive parts of a solar panel are plexiglass sheets, an air blower, and wooden elements. If your budget is low, there are some cheaper alternatives for components.
For example, you can make the solar panel front cover using Lexan. Comparing to the UV resistant polycarbonate sheet, Lexan is a lot cheaper but also less efficient.
Before you start collecting parts for homemade solar panels, do not forget the importance of solving any thermal leakage and insulation problems in your home. With proper insulation, you will be able to heat your home with less energy, thus with a much smaller solar panel.
That also means you will spend less money on parts for your home solar heating do it yourself project and lower the solar panel costs to less than $200...
Solar install kit technical specs:
| Panel Width: | 1.09m |
| Panel Hight: | 2.2m |
| Panel Depth: | 160mm |
| Total Area: | 2,4m2 |
| Effective Area: | 2,3m2 |
| Weight: | 66 kg |
| Intake diameter: | 100mm |
| Outlet diameter: | 125mm |
| No. of cans: | 225pcs |
| Orientation: | vert/horiz. |
Discover the Benefits of Solar Powered Home (for a Few Hundred Bucks)
This is exactly why the utility company hates me.
Hit the play button to see how my DIY solar furnace works:
Video shows solar panel efficiency and operation on a bright sunny day. After only 20 minutes, the air temperature entering our solar-powered home rose quickly to 50°C/122°F.
Differential thermostat (snap disc - temperature circuit breakers) controls the fan. You can get it from almost any electronic component store.
The thermostat has two sensors:
- The sensor inside the top opening (hot air);
- The sensor located in the bottom opening (cold air supply).
When on/off temperature thresholds are set correctly, solar panel can produce an average of 2 kiloWatt of free energy for home heating. Solar power output generally depends on the system size and how much sun there is during the day.
Homemade Solar Panel Test Drive
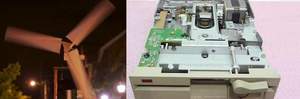
The first test of the solar heating do it yourself was carried out in the backyard (without mounting racks) on a sunny winter day without any clouds. After only 10 minutes in the sun, the solar furnace started to produce hot air (70°C/158°F)! I have used a big cooler extracted from a faulty PC power supply as an air blower fan.
Test results and solar panel efficiency encouraged me to have the solar array installed on the house as soon as possible.
With the solar panels installed, the outside temperature fell below -3°C/26°F. Surprisingly, the solar panel was already supplying the room with 3m3/min (3 cubic meters per minute) of warm air. At the same time, I have switched to a more powerful fan. Hot air temperature went up to +72°C/162°F (measured with a digital thermometer).
To calculate a solar furnace's total energy production, I put the airflow and average air temperature output into the formula. My calculation showed that solar power output from DIY solar panels was approximately 1950 W (watts), almost 3 HP (3 horsepower)!!!
Solar Powered Space Heater Pros and Cons
CONS: This solar thermal system does not have a battery bank. Logically, without battery systems, it will not be able to accumulate thermal energy after producing it.
When it's sunny, a solar furnace produces heat, but it is necessary to use it instantly. If the sun does not shine, it is required to block the solar furnace air supply; otherwise, the room will begin to cool off. You can solve this by installing a shut-off valve, which reduces unnecessary heat loss.
PROS: Solar kits are much easier to install compared to DIY solar. Given the cost-effectiveness and excellent results, the conclusion is that do it yourself solar panels are worth making. Solar panel, at the very least, can be used for additional heating of your home. It's up to you to calculate and figure out how much money you can save with renewable energy and a solar furnace (hint: try solar calculator). Also, there are no toxic components like lead acid battery systems.
With cheap diy solar panel installation, you can also achieve significant savings during the heating season.
Depending on the construction and material quality, one square meter solar furnace can supply solar energy for 10 - 15 m² (107 - 160 ft²) of your living space. In other words, 2x1m solar panels (21 square feet covered with pop cans) can heat up to 30m² (30 square meters or 320 ft²) of your home.
The bottom line?
Depending on your location and available sun hours, solar panels can provide a short payback period while being a relatively cheap investment at the same time.
This is even without the federal solar tax credit that brings significant cost savings.
Beer Can Solar Heater Efficiency
Let's explain little bit about the actual solar furnace efficiency.
For example, in New York City latitude, the sun delivers up to 1000 Watts per m² (10 ft²).
Out of those 1000 Watts, photovoltaic panels can capture around 200 W per m² (10 ft²). At the same time, a DIY solar heater of the same size can capture 500 - 800W per 10 ft² (1 m²), which is up to four times more!
On top of everything, by choosing DIY, I saved almost $1K on my electric bill last year, thanks to this solar furnace. You also save on solar permit, solar tax credit and permits guides as well.
During the research phase, I have found tons of heavily advertised guides for sale on the Internet that promise you can make community solar PV panels that will provide "90%" of your home's power for a few hundred dollars.
So don't waste your money or time on some lame Clickbank guide to diy solar (unless it's free, of course). Most of such guides explain diy solar systems and grid tied solar, often named as Avasva solutions free solar panels or Avasva solar plans...
You will find plenty of free and honest information online, from reputable solar resources like mother earth news, energy.net, builditsolar, canadian solar, etc.
DIY Solar Frequently Asked Questions (and Answers)
Can you build your own solar panels?
Yes, absolutely! Although residential solar companies and professional solar installers will always suggest that building solar panels is very complicated.
You can build and install a cheap, 2 KW solar furnace using a proven step-by-step solar guide (it's free!).
Are DIY solar panels worth it?
Yes, but only if you are eager to start building something with our own hands.
You can build and install a 2 KW DIY solar furnace using my proven step-by-step solar guide (it's free!).
How much does it cost to make your own solar panels?
Around $200 for a 2KW solar system - if you are building all DIY solar kit components on your own.
Suppose you're simply assembling a solar kit (solar panels, string inverters, and solar batteries). In that case, it will cost you around $1.5 per Watt or $3000 for the 2KW system.
What can I use instead of solar panels?
Instead of PV solar panels, you can use soda cans to build and install a 2 KW solar furnace using our step-by-step solar guide.
But wait, there's more...
Subscribe to FreeOnPlate.com notifications, and you'll also learn how I lowered the cost of solar, including the payback period, without a rebate, solar tax credit, or solar financing.
So what do you think, to DIY or not to DIY Solar?