DIY Wind Generators: Best Motors for DIY Wind Turbine Plans

Today you're going to learn how to choose wind turbine motors and build a simple and cheap low power wind turbine, entirely homemade from scratch.
Want to know the best part?
You can easily find the best motors for DIY wind turbine plans online.
Disclosure: Some of the links below are affiliate links. This means that, at zero cost to you, freeonplate.com will earn an affiliate commission if you click through the link and finalize a purchase.
Or even better, you can construct homemade wind turbine entirely using some scrap parts.
In fact, both approaches are affordable and quite simple. I’ll reveal everything in a minute.
And for those who are nervous to get started, I have good news.
In 2022, it's possible to buy a complete wind turbine kit for the price of a motor!
Here is the proof:
| Product | Horizontal Wind Turbine KIT | Motor for DIY Wind Turbine |
| Power | 800 W | 400 W |
| Preview |  |
 |
| Rating | ✅✅✅✅✅ | ✅✅✅ |
| Price | Check price on Amazon | Check price on Amazon |
Or the following runner up products:
| Product | Vertical Wind Turbine KIT | Motor for DIY Wind Turbine |
| Power | 400 W | 400 W |
| Preview |  |
 |
| Rating | ✅✅✅✅ | ✅✅✅ |
| Price | Check price on Amazon | Check price on Amazon |
Keep reading in case if you are determined to buy a motor only and build your DIY wind turbine from zero.
Table of Contents
People often ask me for advice on how to build a wind generator from scratch.
The truth is, most of them only want to build wind turbines for fun.
However, some people are forced to seek alternative ways to get electricity as they live in an area with no access to an electrical grid, so renewable energy is the only option.
Let's see what are the wind turbine types and how wind generator works in detail and explain some advanced concepts of getting electricity from the wind energy.
After thorough research, I concluded that it is a success if you get the same price per kWh as from the utility distribution.
On the other hand, Kilowatt-hours produced by the wind generator are generally more expensive due to the following:
- High maintenance costs;
- Incorrect dimensioning of the wind turbine in the first place (local conditions and average wind speed of the area should be considered before constructing the wind turbine system);
- Expensive system components (neodymium magnets for wind generator, SLA batteries, PWM charger, converter/inverter, and construction itself).
In the US, electricity production for our own needs is allowed without any taxes or fees. However, it is illegal to sell it (if you are not registered for that).
The allowed height of the building on private residential plots is 12 m, so that is the maximum height of a windmill with a propeller in the US.
Wind Turbine Types
There are two basic types of wind powered turbine, HAWT and VAWT.
Let's explain both types:
HAWT
HAWT - horizontal windmill with propeller and wind direction indicator, with 50% maximum efficiency (which means if the wind blows 5kWh / m2 windmill can convert only 50% of it into electricity. Important features are the area covered by the rotor - "swept area "(if one blade is 1m long, the total gripping area is 3.14m2), then the area of the propellers themselves, the pitch of the propeller, the ratio of the rotational speed of the propeller to the wind speed" tip to speed ratio ", etc.
Its biggest drawback is the design solution transmission of electricity from the rotor to the pole (usually with graphite brushes but with losses due to sparking and poor fit) and power losses due to change of wind direction and high-stress force when changing direction. "furling", by changing the pitch of the propeller into an empty so-called "yawning", hydraulic brake, parasitic load (three heaters, electronically controlled load at a given speed).
VAWT
VAWT - vertical windmill, used in areas where the wind direction is variable intensity because it is immune to change, maximum efficiency is 40% (for Darius type, has excellent application due to simple design and sound construction characteristics), essential characteristics are the profile of the propeller or in this case sails (AIRFOIL NACA 0018 is most used e.g.) then the angle of attack of each sail or "pitch", or with 20% efficiency (Savonius type, high torque, significant drag losses "drag", low speed, rarely used).
Wind Turbine Motors
It is not easy to choose the best wind generator motor. The following motor types are often used as generator for wind turbine:
- DC motor, also called dynamo generator;
- AC mono-phase motor, also called alternator;
- AC poly-phase motor. Stepper motor generator is such an example. Permanent magnet alternators are 3-phase, AC motor generators.
How Does a Wind Turbine Generate Electricity?
Wind generator uses wind energy as mechanical power for the production of electrical energy. Check out this impressive animation of the wind turbine working principle.
How to Build a Small Wind Turbine
Today we are also going to show you how to build two types of wind turbine:
- DIY Wind turbine from an old floppy disk drive
- DIY Wind turbine from an old VHS videotape
Does anyone remember what VHS tape or floppy disk is?
Stepper Motor Generator: How To Build Wind Turbine using Floppy Drive
You can connect light bulbs, LED lights, or similar devices that draw up to a few watts to a small home-built wind generator made out of parts and motor scraped from an old 5.25" floppy drive!
Construction does look like a toy. Still, it can come handy in various situations: camping, fishing, sailing, or wherever the power grid is not available.
There was a good reason to use stepper motor salvaged from a floppy drive. PC technology is aging very quickly, and a floppy drive can be bought cheap, or even free of charge.
Stepper motors are very convenient for small wind generators. First, they do not need any gearing mechanism and the rotor can be attached directly to a turbine - propeller. Such construction will simplify wind turbine building and lower the noise produced by the windmill.
Step motor produces stable voltage even on low rpm (200 rpm), which is a great advantage comparing to DC alternators/motors. DC motors require at least 10 to 15 times higher rpm to achieve similar power output. This is very important, especially with the low wind periods.
If you want to start smaller, there is a wind belt DIY project described later in this post. Wind-belt can also charge mobile phones, Bluetooth speakers, and batteries (AA/AAA Ni-Cd, Ni-Mh).
Do wind turbines produce AC or DC?
Most wind generators produce AC; however, some motors produce DC.
Wind turbines based on step motor or permanent magnet alternator produce AC only.
DIY wind turbine that use DC motor is producing DC current.
Do wind turbines need inverters?
Rectified and stable power supply is provided using an electronic circuit (few diodes, resistors, condensers, and an integrated circuit). Anyone with previous soldering experience will be able to construct it.
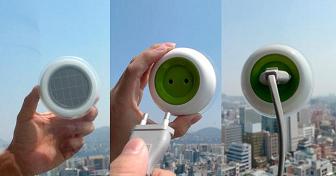
EDIT: In 2022, there is no need to construct electronic circuits from scratch, unless you want to. It is cheaper and easier to buy complete electronic modules from aliexpress or eBay; 5-volt buck converters cost only several US$.
How much voltage does a home wind turbine generate?
When it's windy outside, the generator of our small windmill produces electric energy sufficient for LED flashlight or battery charging. We have attached a female USB port to the wind generator. That way, wind could charge all your mobile devices: iPod, cell phone, Bluetooth speakers, and more.
Does Residential Wind Turbine require batteries?
The wind turbine does not necessarily need a battery to operate, but you need to use generated power instantly. However, adding batteries to the wind generator system allows you to use electric power even during the periods without the wind.
Combine battery aided wind turbine with solar power and you've got a nice off-grid system.
Steps how to Build Floppy Drive Wind Turbine
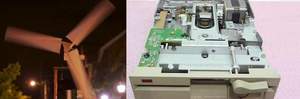
First, find an old generation PC386, open it, and remove a 5.25-inch floppy drive unit - Picture 1. As you already guessed, the floppy drive will serve as a "donor" for the most crucial part - stepper motor. After opening the floppy drive unit, carefully extract the motor (pictures 2 and 3).
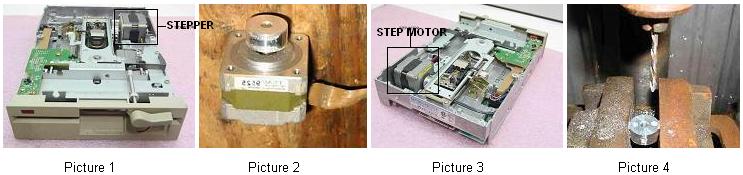
Drill two holes with a stationary drill on the shaft, as shown in Figure 4. Now you can directly attach the turbine (propeller) onto the stepper rotor, using two screws.
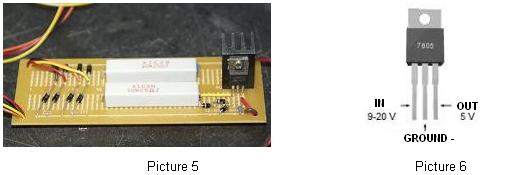
Next, we will construct an electronic charge controller (Picture 5). This circuit will convert AC to DC (rectify alternate current) and stabilize the voltage precisely at 5 volts (Picture 6) so that we can harmlessly connect any USB device.
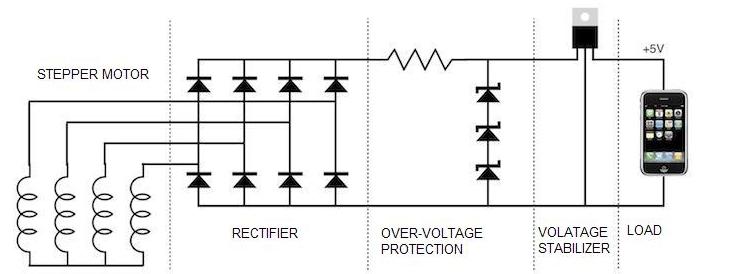
Picture 7 - Wind generator schematic diagram
Electronic components should be soldered according to the electric diagram above. We need to connect wires coming out of the stepper motor to rectifying diodes 1N4004 (picture 7 - shown on the left side).
WARNING! Stepper motor usually has five wires, although there are some with 4, 6 or 8 wires. It is essential to determine which type of stepper motor you have to connect it correctly with the electronics of the wind generator. Here you can find necessary details how to connect different stepper motors. Although it's not that easy to "burn" a stepper, I advise you to be cautious!
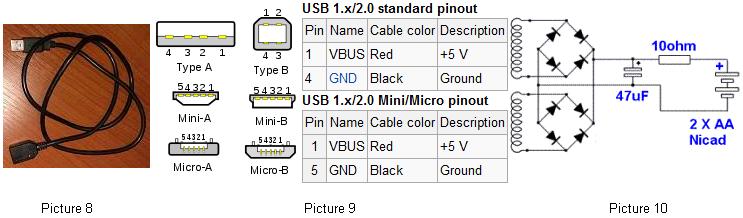
We have bought USB extension cable (Picture 8) on e-bay, cut it in half and connected wires coming out of female USB connector directly to the output of windmill electronics (picture 7 - shown on the right side). The USB extension cable has four wires, but we only need the outer two, plus and minus 5V (Picture 9).
If you want to use a wind turbine for battery charging only, you can build much simpler electronics than the one we have used (Picture 10).
WARNING! Before connecting any USB device, it is MANDATORY to check polarity and exact voltage (it has to be between 4.9 and 5.2 Volts) on USB connector!
Wind Turbine Installation
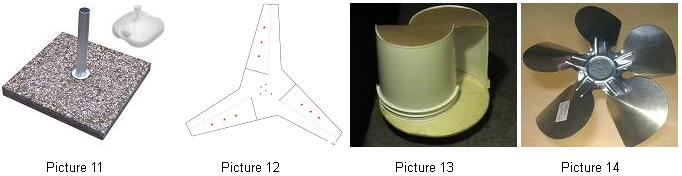
Now it's time to make the remaining mechanical parts for the wind generator: prepare a bracket and a turbine (propeller). The bracket is made out of the aluminum tube with 3-4mm diameter. Do not forget to fix it firmly. If you plan to move wind generators from one place to another, the best solution would be a bracket fixed using an umbrella stand to ensure mobility (Picture 11).
Generator (stepper motor) can be easily fastened directly to the bracket using clamps or using a metal "L" profile. The solution depends on whether you will use a horizontal or vertical turbine. We made both versions, and it is up to you to decide which you prefer.
What is the best material for wind turbine blades?
If you pick a horizontal axis wind turbine, you can create a three-bladed propeller using the meter, pen, and scissors for cutting sheet metal.
You will need a sheet metal panel of 0.8x0.8m, 0.5mm thick. Cut out the pieces and form them as directed on picture 12, and attach the turbine to the rotor of the stepper motor with screws.
If you do not have time to make everything by yourself, you can buy prefabricated propeller in any hardware store (Picture 14).
For the vertical axis wind turbine, the simplest way is to make a turbine out of a plastic bucket (paint container). Cut it in the middle, fix it onto a round wooden or plastic plate (Picture 13). Finally, the whole windmill structure should be mounted on the generator rotor (stepper motor) with screws.
During strong winds (over 10 m/s), the mini windmill will produce around 5 watts. This is a maximum you can achieve with a floppy drive stepper motor.
Still, output power also depends on the dimensions of the stator and the propeller blades.
Vertical axis wind turbine is most suitable for roof mounting because it is the most effective in turbulent conditions (fast-changing wind direction). For outdoor usage - you can use a windmill with the horizontal axis and three-bladed wind turbine.
Can a small wind turbine power a house?
Our small 5 Watt wind generator is not able to power a house. However, we are currently preparing another DIY project - a 100 watt Wind Turbine.
In combination with the right battery bank, 100 watts can easily power a TV, LED bulb, and a laptop.
As a generator core, we will use a stepper motor again, but this time from an old A3 dot-matrix printer.
What is the average DIY wind turbine cost?
Read on to find out:
Cheap Wind Turbines: How to Build a $5 Wind Belt Generator
So how to make a windmill without motor?
Micro wind belt generator is the answer. And it is probably one of the cheapest and easiest DIY project ever. Despite its limited power capacity, a small wind turbine can be used in situations where conventional wind generator would normally fail.
Windbelt is assembled using parts worth less than $5, which makes this windmill extremely cost-effective! Price can go even lower if you use an old VHS videotape, small fridge magnet, and transformer coils.
On camping or sailing, a wind belt generator can easily top up your Bluetooth speakers, batteries, cell phone or a small LED flashlight...
What is a "Windbelt" Wind Turbine?
Wind belt is a vibrating membrane fitted with a pair of magnets that oscillate between copper wire coils. It works even in the light breeze which makes it an ideal small-scale wind generator.
The device itself does not include any mechanical moving parts; it uses vibration to generate electricity. Conventional wind generators with rotating blades do not scale down so well due to high friction of moving parts and other mechanical components.
When it's windy outside, the small wind-belt generator produces power sufficient for solar LED flashlight or battery charging.
VHS Wind belt Generator - Construction Details
First, we have gathered all the necessary parts for our micro wind generator:
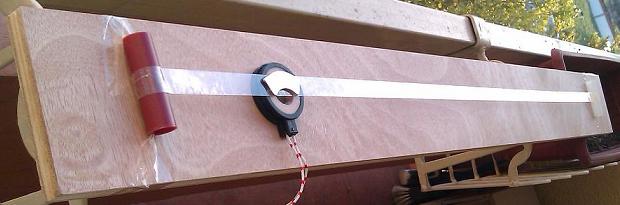
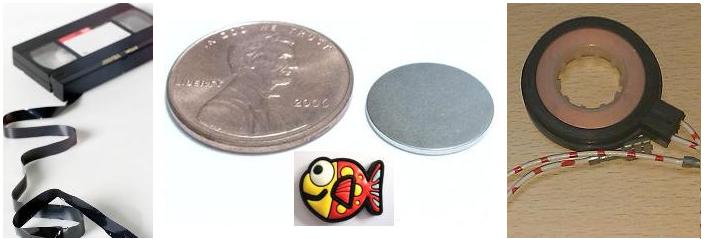
- An old VHS videotape serves as a membrane (Picture 1);
- Two small neodymium magnets scraped from PC HDD (Picture 11) or fridge-magnet souvenirs (Picture 2);
- Copper wire coils - Picture 3.
You need to fix the magnet(s) onto a VHS tape using glue. When a magnet moves near a coil, the electrical current is generated and flows through the wire. Therefore wind belt starts to generate electricity.
picture 1 picture 2 picture 3
Windbelt Inverter Electronics
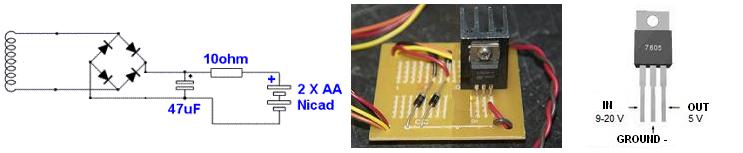
If you want to use a wind generator for LED lights or to charge batteries, there is no need for some hi-tech or complicated electronic circuits at the output. In case you want only to charge batteries, you can use a very simple rectifier circuit (Picture 4).
To charge USB powered devices, you will also need a small voltage regulator (Pictures 5, 6, and 7). Also, you will need two neodymium magnets and two coils (connected in series) on the wind belt.
Electronic components should be soldered according to schematic diagrams shown below. Wires coming out of the coil(s) should be connected to rectifier diodes (Picture 7).
picture 4 picture 5 picture 6
WARNING! There is only one way to connect the diodes correctly! Check out how to determine the polarity of a diode; it is important to locate the anode pin. Low power 1N5817 Schottky diodes are most convenient for windbelt generator.
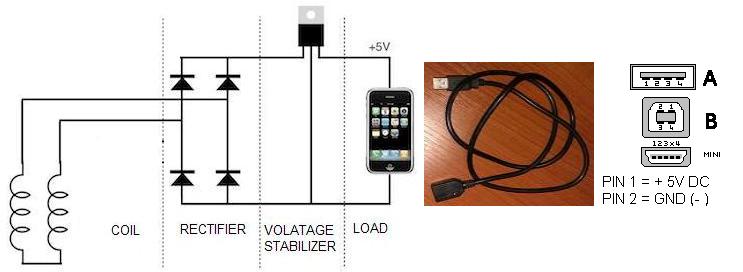
picture 7 - Windbelt electric schematic diagram picture 8 picture 9
We have bought a USB extension cable (Picture 8) on e-bay and cut it in half. Then we have connected wires coming out of female USB port directly to the output of windmill electronics (picture 7 - shown on the right side). The USB extension cable has four wires, but we need only outer two, plus and minus 5V (Picture 9).
WARNING! Before connecting any USB device, it is MANDATORY to check polarity and exact voltage (it has to be between 4.9 and 5.2 Volts) on micro-wind-generator USB port!
Windbelt Power Generation Principle
Windbelt has nothing to do with construction based on tesla turbine design.
The prototype with a 65cm long membrane (Picture 10) and a strong neodymium magnet (Picture 11) can generate 40mW in a 10mph wind.
Not a lot of power, however, an array of wind belts could be assembled to generate more power. Existing Windbelt prototype can generate electric energy in winds over 4mph and at attack angles of up to 60 degrees.
What wind speed is best for a wind turbine?
As the wind speed goes up from 4 to 14 mph, the power output increases at a rate close to a cube of the increase in wind speed. At wind speed above 14 mph, the power output becomes constant.
One way to improve and stabilize the output of a wind belt turbine across a broader range of wind speed would be to dynamically increase the tension of the membrane as the wind speed increases.
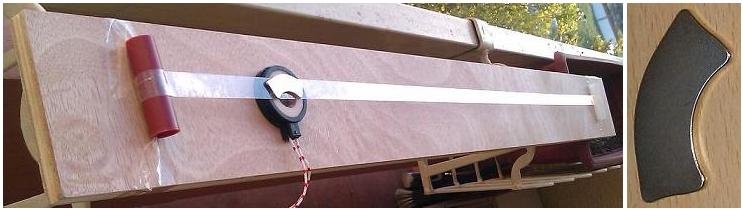
picture 10 picture 11
The key advantages of windbelt over existing micro wind turbine technology are not only the cost but simplicity. Also, the fact that it is good at taking power from turbulent wind flows, i.e. in a built-up domestic setting, and it is also very quiet in operation.
Unlike PV solar panels, wind turbine generators do not scale down so well. Large wind turbines can generate cheap electrical energy very efficiently. As the size of the wind turbine is scaled down, efficiency also reduces, and costs per generated watt go up enormously.
Wind Belt Turbine Usability
Wind belt is an ultra-efficient and mechanically very simple substitution for the wind generator. Its' cheap components can be bought almost anywhere in the world. Windbelt is an original innovation of Mr. Shawn Frayne.
Shawn constructed this simple device with a taut Mylar membrane fitted with a pair of Neodymium magnets that oscillate in and out of coils because of the mechanical resonance of the membrane with the wind blowing across it.
At 10mph wind speeds, the membrane oscillates at 90-100hz - the magnets move in and out of the coils 90-100 times per second. Unlike a photovoltaic solar panel or conventional wind turbine generator, anybody can construct, repair, and maintain a Wind-belt. Large homemade versions of the wind belt are doable, but usually, the problem of noise emerges.
This is the truth about wind belt:
The power potential of such a low-tech energy source is quite modest. That is why windbelt can supply power only to devices with low energy consumption. But it is perfect for use in remote areas where we do not have an alternative.
As an Amazon Associate I earn from qualifying purchases.